
LAB:
From this window you can manage your LAB's actions, such as editions taken, date sent and date received, and LAB accounts.
Access to this
window is from the main window from the bottom bar in full screen mode, or from
the Actions menu in normal mode![]()
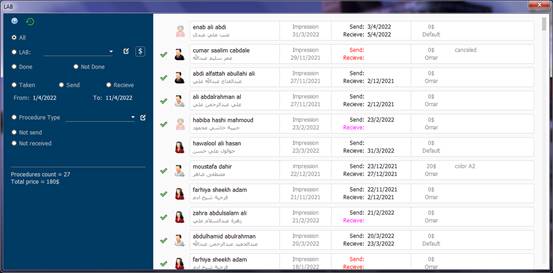
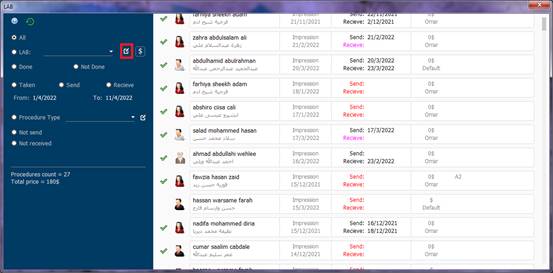
The right section contains the list of patients who have had laboratory procedures.
The list includes procedures, not patients, meaning if a patient has two procedures related to the laboratory, the patient's name will be displayed twice.
Determining the work of the LAB:
The names are automatically added to the laboratory list, you cannot add a patient to the laboratory list directly.
When adding a new visit to a patient, if one of the procedures performed in that visit is related to the laboratory, the name of the patient is automatically added to the laboratory list.
To define the actions of the LAB:
From the left pane in the LAB window:
![]()
This is a filter by action
Click on the
icon
![]() , the LAB's
actions menu window will appear:
, the LAB's
actions menu window will appear:
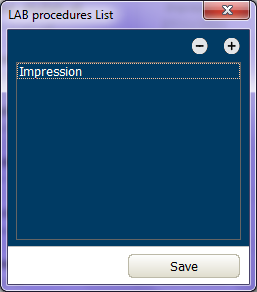
This list includes all laboratory procedures
To add a new
action, click on the icon
![]() . A window will appear containing all the actions that
can be performed in the visit:
. A window will appear containing all the actions that
can be performed in the visit:
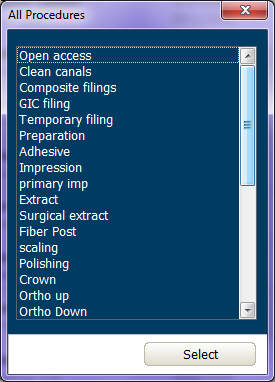
These procedures are the same as those in the Procedure window
The contents
of which can be modified through the icon
![]() within the Action window
within the Action window
search filter:
All patients
who have had a laboratory procedure can be viewed by selecting the All option
![]()
Actions for a
specific LAB can be displayed by selecting the LAB . option
![]()
Click
![]() to select
the desired LAB.
to select
the desired LAB.
Click
![]() to edit the
list of laboratory names.
to edit the
list of laboratory names.
Click
![]() to display
the LAB payments . window
to display
the LAB payments . window
To view
actions marked "Done", select the option
![]()
To view
actions that are not marked "Done", select the Not done option
![]()
To view actions by date, choose:
![]()
Choose the time period by clicking on the two dates:
![]()
By default, the date will be from the beginning of the current month to the current day.
To view actions by type, choose the type from the list:
![]()
To modify the
list of action types, click on the icon
![]() (it was explained earlier in this file)
(it was explained earlier in this file)
To view actions that were performed but not sent to the LAB, choose Not send:
![]()
An action for which a date of sending and receiving is not specified is considered unsent.
To view actions that were sent but not received, select Not received:
An action for
which a send date is specified but no date is received is considered not
received.
![]()
Below you will find the number of procedures currently offered, and their total price.
![]()
Procedure details:
![]()
For each procedure there is the following LAB:
![]() Done icon
Done icon
![]() The patient's picture,
his full name, his nickname
The patient's picture,
his full name, his nickname
![]() Procedure name, date of visit in which the procedure was performed
Procedure name, date of visit in which the procedure was performed
![]() Date of dispatch and
delivery
Date of dispatch and
delivery
 The price of the
procedure to be paid to the LAB, below is the name of the LAB custom for the
procedure
The price of the
procedure to be paid to the LAB, below is the name of the LAB custom for the
procedure
![]() A note written by the doctor about the procedure (eg color)
A note written by the doctor about the procedure (eg color)
To modify the action details:
The procedure card is divided into three areas

Patient file visit procedure
When you click on the first section, the patient file window will appear
When you click on the middle section, the visit window will appear
When you click on the last section, the action details window will appear
Action details window:
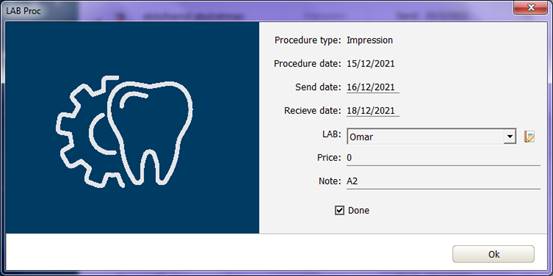
In this window:
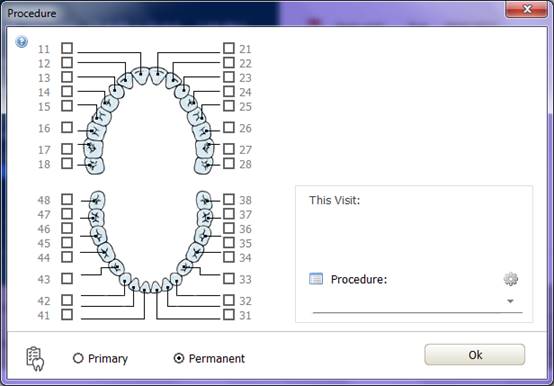
Procedure type: It cannot be modified from here, it is entered from the visit window.
Procedure date: The date of the visit in which the procedure was performed, it cannot be modified from this window.
Send date: The date the action was sent to the LAB, click it to edit.
Receive date: The date the action was received from the LAB, click it to edit.
LAB: The name of the LAB assigned to this procedure.
Price: The price to be paid to the LAB for this action.
Note: A note written by the doctor (eg colour).
Done: Flag Done if the action is completed.
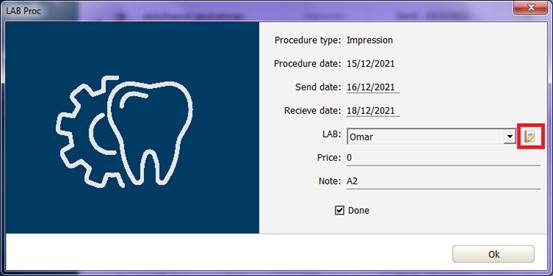
To modify the list of laboratory names, click the
icon
![]()
Modify the list of laboratories names:
The laboratories name modification window can be accessed from:
Icon
![]() in the LAB
window:
in the LAB
window:
or the icon
![]() in
the action details window:
in
the action details window:
Lab names window:
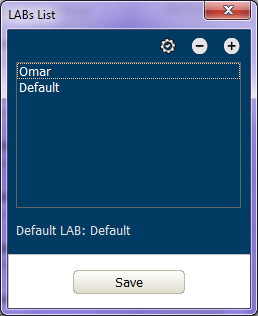
Click
![]() to add or
delete the name of the LAB.
to add or
delete the name of the LAB.
Below you will find the name of the LAB approved by default when a new action is taken
![]()
To change the
name of the default LAB, select a name from the list, click the icon
![]()
LAB payments:
From the LAB
window, click on the icon
![]() :
:

The LAB Payments window will appear:
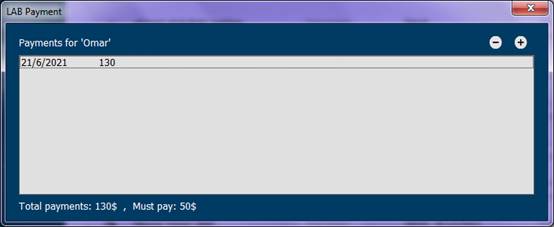
In the list is displayed the date of payment, the amount paid, a note entered by the doctor.
At the bottom of the window, the total amount paid to the LAB, and the remaining amount is displayed.
The amount to be paid to the LAB is calculated by adding up the cost of all actions assigned to the laboratory, whether or not dispatched.
The method of financial dealing between the doctor and the LAB may take various forms according to the agreement, it can be the payment for each procedure independently, or the payment at the end of the month, so the payments are recorded independently for each LAB.
To add a new
batch, click the icon
![]() , a new window will appear:
, a new window will appear:
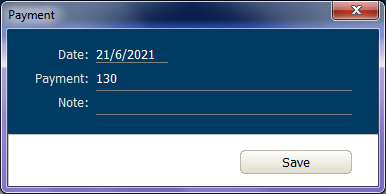
appears in the window:
• Payment history, click to edit.
• The amount paid.
• A note to be entered by the doctor.
Click "Save" to save the modifications.