
Server window
From Control Panel > Administrative Tools > Server
If this is the first time you open this window, the window will appear with empty fields except "Dentiary ID"
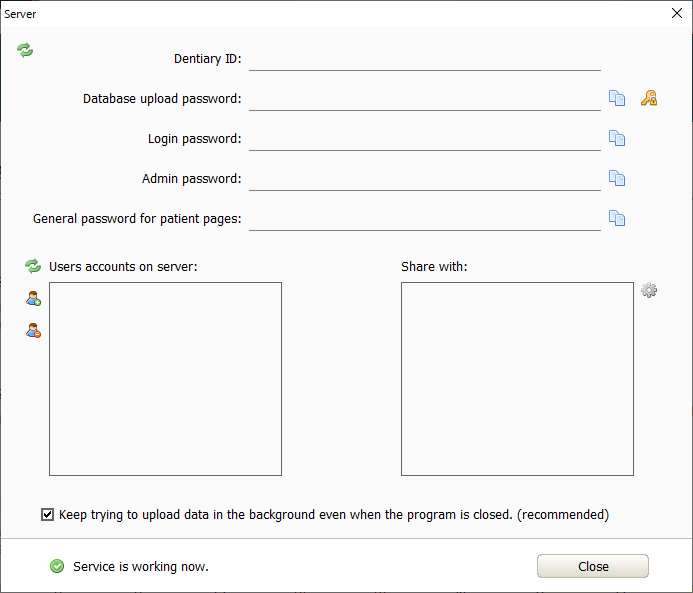
Dentiary ID:
It is the unique number of the copy of the software on your device and is the identification number that identifies the software.
Upload password for the database:
For security reasons, a password must be entered in order for the program to access the database on the server.
When you run the program for the first time, a random password will be generated by the server and sent to you in the e-mail that was sent to you at the time of registration.
Check your email to be sure, you may find the message in the spam section.
If you do not receive the message, click on the orange key icon. The code will be resent to the email you entered at the time of registration.
In the event that you did not receive the message or encountered a technical problem, contact the help center immediately by mail
support@dentiary.com
To modify the upload password, click on the field, a window will appear. Enter the current password that was sent to your email, then enter the new password. You must be connected to the Internet to be able to change it.
login password:
It is the password for logging into the database on the server, you can modify it directly.
Admin password:
By default on the server there is an account named "admin" with which you can access all patients in any database.
By entering the username "admin" and the administrator password in this field, you can log in with the administrator account.
General password for patient pages:
For each patient, a page is created automatically (if the feature is activated). To enter the patient’s page, the card number and password are required. Access to it is from the link
https://server.dentiary.com/patient/
Each patient has his own password, for example his mobile number, so that the doctor can access the patient pages without the need to memorize the passwords of his patients. The general password can be used to enter the page of any patient.
User accounts on the server:
The users on the server are different from the users in the program, it is preferable for each doctor to have his own username.
In general each database can be shared with one or more accounts, specific patients can be shared with specific accounts.
For example, it is possible for each doctor in the clinic to have his own account, it is possible for the doctor to share some of his patients with the account of the other doctor, and the clinic manager can have an account (other than the administrator account) and all patients are shared with him, it is possible to create a temporary account for a doctor from outside clinic and share some patient files with him temporarily.
The accounts already
exist on the server, to update the list, click the icon ![]()
To create an account,
click on the icon ![]() and enter your new username and
password (an account can be created without a password).
and enter your new username and
password (an account can be created without a password).
To delete the account,
click the icon ![]()
Share with:
Here each database and the accounts with which patients are shared are identified.
Double-click the database name, or select a database from the list and click the icon
The server settings window will appear:
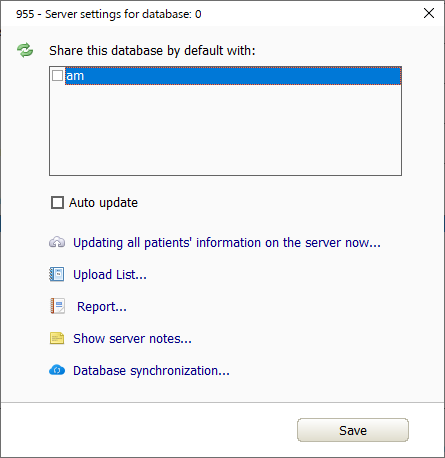
At the top of the window is a list of existing usernames, select the usernames you want to share this database with.
Every time a patient's data is modified, his data will be updated on the server (the patient's data whose data has been modified). To cancel the automatic update, remove the check next to "Automatic Update".
To update all patient data at once, now click on “Update all patient data on the server now”, an upload list will be created that includes all patient data, the data is uploaded in small parts so that the upload is done even if the internet connection is very slow, if the number of patients is large The upload may take a few hours to finish, the upload process takes place in the background, so you can continue using the program as normal.
The upload list includes patient data that has not been uploaded yet, the upload may have stopped due to a loss of internet connection, or the data may be waiting to be uploaded if the list is long.
To see the upload list
click ![]()
When uploading the data
of each patient, the status of the data is recorded, if it was uploaded
correctly or if there were errors, to see the details, click ![]()
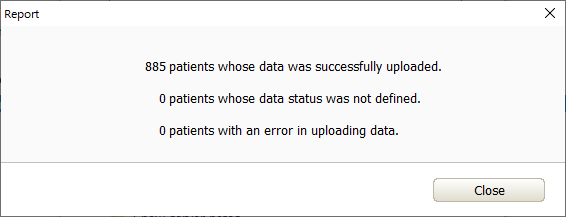
Click on each of the options to see which patients were not uploaded correctly.
To see all notes that
have been sent from the server, click ![]()
In the event that there are errors in the server data, you can perform a database synchronization, as the errors, if any, are corrected.
Keep trying to upload data in the background even when the program is closed:
When any modification is made to a patient's data, the program adds the data to the upload queue. If the computer is connected to the Internet, the upload takes place within seconds.
In the absence of a connection or a very bad connection, the program will still try to upload at the earliest opportunity.
The process responsible for uploading data is independent of the program itself, so the process can remain running in the background even when the program is turned off. This is recommended to ensure that all data is uploaded correctly.
Service is now running:
As we said earlier, the process responsible for uploading data is independent of the program itself. Here, the status of the process appears, whether it is working or not.
Access clinic data online anywhere in the world:
Enter the link
https://server.dentiary.com/doctor/

In the first rectangle "Dentiary ID" enter the Dentiary ID
In the second rectangle "LOGIN PASSWORD" enter the login password as in the "Server" window
In the third rectangle "USER NAME" enter the name of the user, which is one of the users in the list of "user accounts on the server" in the "server" window, you can enter the administrator account by writing "admin" in this field.
In the fourth rectangle "USER PASSWORD" enter the password for the user.
Click on "Go to my page"
A list of all patients in the requested database will appear.
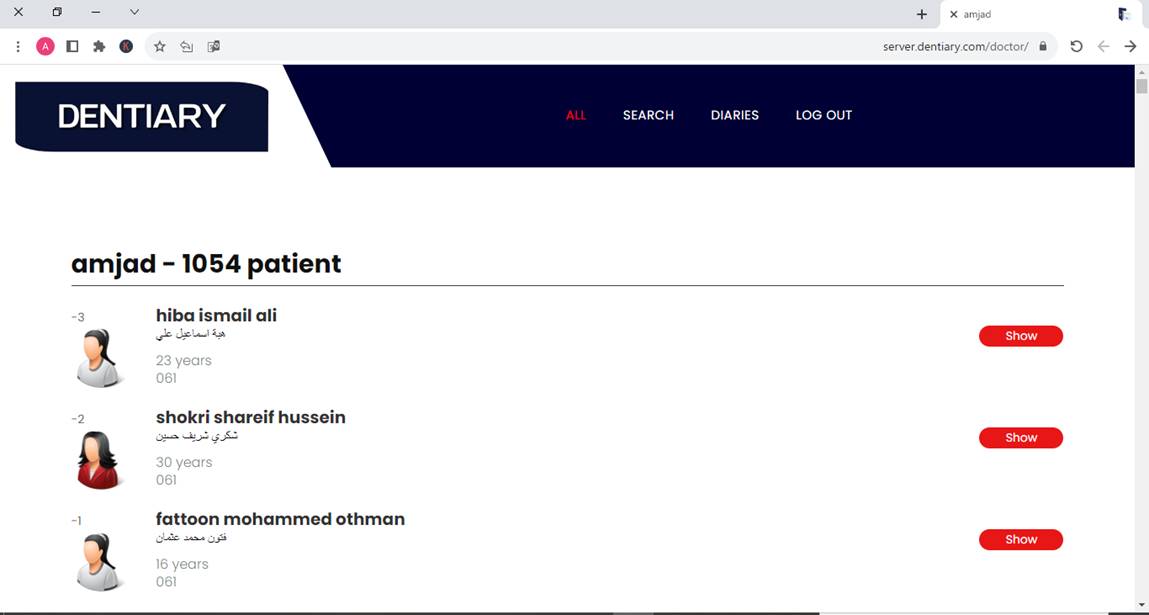
A list of patients' names appears, with brief information about each of them, including full name, surname, age, mobile number, and a symbolic image related to age and gender. The image here is symbolic and not the image specified on the computer.
To search for a patient,
click ![]()
To see the diary click ![]() , by default you will see the diary of the current
date.
, by default you will see the diary of the current
date.
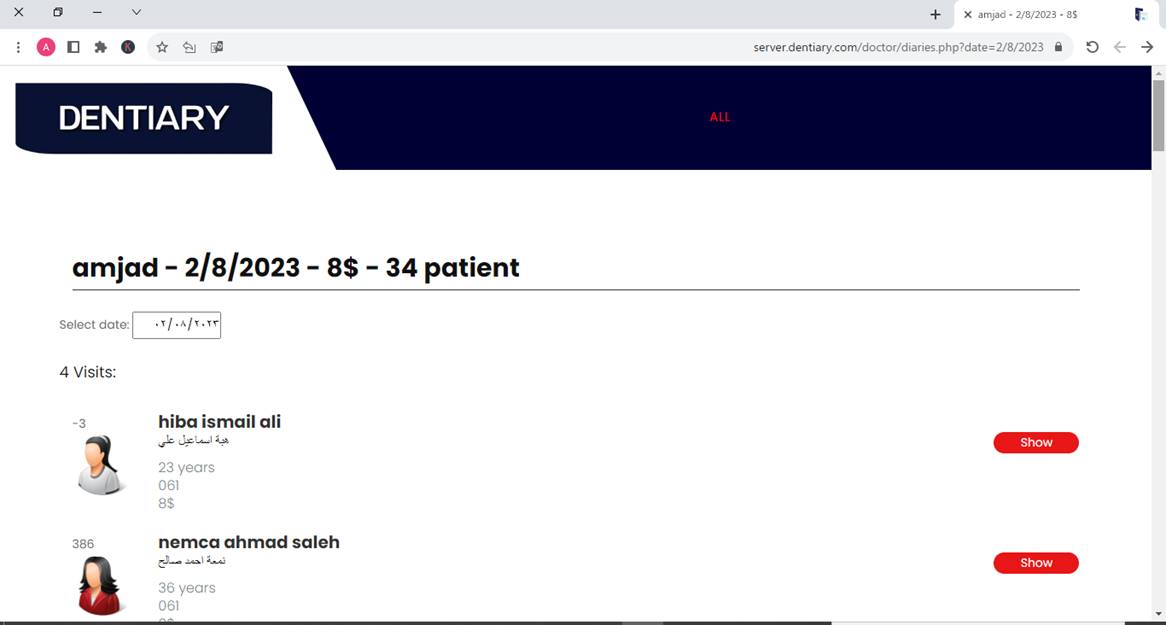
In the top bar, you will find the name of the current user, the date, the total patients paid on the specified day, the total number of patients shown on the page (visits + appointments)
Below it you see the date selection.
Then the list of visits and above it the total number of visits (without the appointments), scrolling down the page you find the appointments.
To see patient
information in detail click ![]()
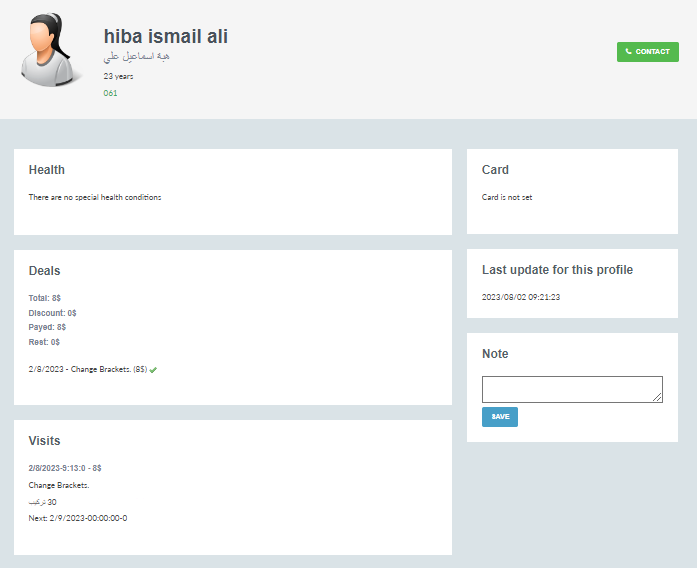
At the top, the patient's full name, surname, age, phone number, and other personal data, if any, appear.
By clicking ![]() you can initiate contact with the
patient if you are using the mobile to access the data.
you can initiate contact with the
patient if you are using the mobile to access the data.
The patient page is divided into several sections, in each section specific data appears.
health:
The patient's health data, the diseases he suffers from and the medications he takes.
Deals:
The agreement with the patient, the total agreement, the amount of deduction or tax, paid, and remaining.
Then a list of current agreements, and a check next to the expired agreement.
Visits:
Details of the visits, the date of each visit, the amount paid for it, the action taken, notes, if any, the date and duration of the next visit.
Card:
The card number assigned to this patient.
Last update for this profile:
The date and time of the last time this patient's data was modified. In the event that an Internet connection is not available on your computer or due to a technical problem, you may modify the patient's data on your computer without it being modified on the server.
Note:
The data on the server is only for viewing, you cannot modify the data, and any modification or damage to the data on the server (due to hacking, for example) does not affect patient data on your computer. To send data from the server to the computer, write a note in the text box that appears on the screen, then Click "Save"
When the computer is working and connected to the Internet, a window will appear that includes all the notes that were sent from the server, and when the patient's file is opened, a note reminder window will appear.
Last update to this page: 4/8/2023